


Remote desktop connection for multiple users on windows 10
Introduction
In windows we can access the Remote Desktop by using a remote desktop app provided by the windows. In order to successfully access the remote desktop we first need to do some simple setting in : Remote Desktop setting we have to enable the “Enable Remote Desktop” option. Then by using the Desktop name you can access the remote desktop.
But when we try to access the remote computer with simple settings currently active user on the remote computer can not access the remote computer. If a remote computer has multiple user accounts on the computer then we can access the other user without disturbing currently active users on the remote computer i.e. we can make remote desktop connections for multiple users without disturbing currently active user.
How to do it?
To allow multiple remote desktop connections we need to modify the termsvrl.dll which restricts the number of RDP (Remote Desktop Protocol) connections to one. There are two methods developed to enable the multiple RDP session without disturbing currently active user of remote desktop.
- Modifying termsvrl.dll
- RDP Wrapper Library
In this tutorial we will study the second method to allow multiple RDP sessions on windows 8 or 10.
What is RDP Wrapper Library :
RDP Wrapper is a free open source project to enable Remote Desktop Host support and allow us to access remote desktop connections for multiple users without disturbing currently active user.It works as a layer between Service Control Manager and Terminal Services, so we can access the remote desktop without modifying the original termsrv.dll file.
To use the RDP wrapper you must have the original termsrv.dll if you have made some changes or patched it before, it may not work or it will crash any time. So take care of that.
Steps to allow multiple RDP session (using RDP Wrapper Library) :
Step 1. Download RDP Wrapper Library
https://github.com/stascorp/rdpwrap/releases (v1.6).
Step 2. Open RDPWrap-v1.6.2.zip

RDPWrap-v1.6.2.zip archive contains some files:
RDPWinst.exe — an RDP Wrapper Library install/uninstall program
RDPConf.exe — an RDP Wrapper configuration utility
RDPCheck.exe — Local RDP Checker
install.bat, uninstall.bat, update.bat — batch files for installation, uninstallation and update of RDP Wrapper
Step 3. Install RDPWrapper
Open install.bat file with the Administrator privileges. It will install the RDP Wrapper.
Step 4. Configure RDPWrapper
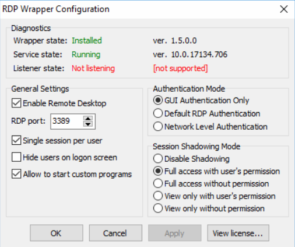
Open RDPConf.exe with Administrator privileges. Make sure that all elements in the Diagnostics section are green. (If your all elements in the Diagnostic section are in the green then you are ready to connect the remote desktop )

If service state is Stopped
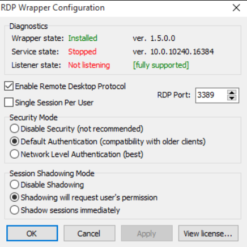
Check TermService is not stopped. To start TermService try command
net start termservice
If version is [ not supported]
- Update the rdpwrap.ini
In order to update the rdpwrap.ini file, you first need to stop the RDP service, otherwise you will get an ‘access denied’ error or similar. - you need to patch your rdpwrap.ini configuration file. You will find the file here: C:\Program Files\RDP Wrapper\rdpwrap.ini.
- First Stop the RDP service. For that use command
net stop termservice
- Download the updated rdpwrap.ini from here:
https://github.com/stascorp/rdpwrap/files/3078951/rdpwrap.zip - For build 18363.836 follow https://github.com/stascorp/rdpwrap/issues/1083
- Download the zip file and overwrite your current file
- Now start the the RDP service. For that use command
net start termservice
Note: If still rdpwrap.ini version is [ not supported] then try another version of rdpwrap.ini. You will get a different file of rdpwrap.ini on github. For me the above file is worked.
Step 5: Setting of RDPWrapper
Security mode: Network Level Authentication
Network Level Authentication decides the user’s credentials from the client through a client-side Security Support Provider and It do the authenticate before establishing a session on the server. Network Level Authentication was introduced in RDP 6.0 .
single user per session
A user will have the same view of desktop/running apps whether its login directly from the console, or (later) logging in through remote desktop. Obviously only one session for that user can be connected at the same time.
Apply the changes
Step 6: Save the changes and reboot.
Step 7:Connect to remote desktop
Now try to connect the Remote Desktop. And access the user which is currently not working. This way you can access the remote desktop without disturbing currently active user.
Conclusion:
This way by modify the termsvrl.dll which define the number of RDP session you can allow remote desktop connections for multiple users on windows 10 or 8.
How to Create Bootable USB Mac OS X installer from Both Windows and Mac
Hey guys,
There are many ways to Create Bootable USB mac osx installer, but I am going to explain only useful information here.
I’ll start with the Windows Tutorial…
- Downloads: Click here to Download PowerISO with crack.
- Installing: Install PowerISO, it’s crack.
- Bootabling : Click on Open and select your DMG or ISO file then click on tools—>Create a bootable USB.
- Device: Select your device to install it on.
- Start: Click on Start and wait until it finishes ( for 4.5 GB it takes about 3/5 minutes….).
- Finish!: Congratulations! Now you have a bootable USB media… please if it won’t work by selecting F12 at boot prompt, modify the BIOS to boot the USB before everything!
*** ONLY IF ABOVE WON’T WORK!
- File ——-> open ——> select your dmg/iso file.
- Right Click on USB device ——> Format with disk image and select your disk image.
- Start format and wait…
- You now should have your Mac OS X bootable USB!
Mac… It’s Easier
- Programs: Open Disk Utility.
- Selections: Select the USB you want to make bootable.
- Clicks: Click on Erase —–> Format: Mac OS Journaled Name: whateveryouwant
- Wait: Wait until it finishes erase….
- Selections: Click (on the left) your USB media you have just formatted then click Restore.
- Clicks: For Source: Click on Image and select your DMG or ISO image For Destination : drag the USB media from the left to the textbox
- Clicks: Click on Restore and wait….. it may take up to 10 minutes…
- Finishes: If you note that your file isn’t bootable then download chameleon bootloader or chimera one and install it (with all customizations you need ) to your USB media….
Third Method – Create macOS Bootable USB Installer using SYSGeeker UltraDMG
UltraMDG from SYSGeeker is an easy-to-use application helping you to create a bootable USB installer from macOS without clicks, no command required and risk free. It supports burning 5+ image file to USB flash drive or DVD/CD, including DMG, Bin, Img and Raw and support the latest macOS monterey and big sur.
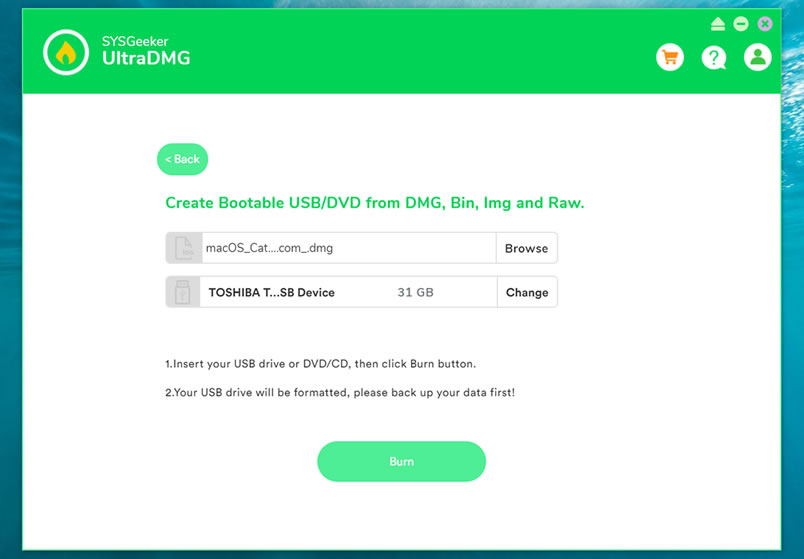
Step 1. First of all, you need to download and install UltraDMG on your Mac or windows computer, then launch it.
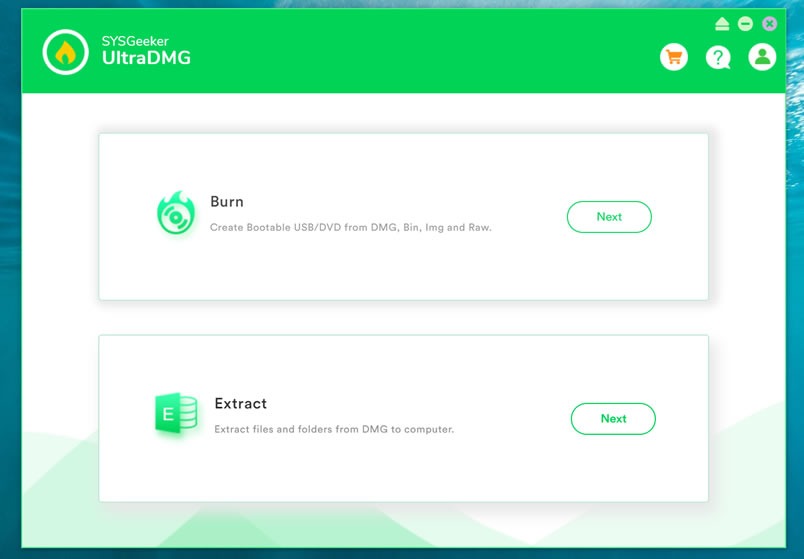
Step 2. To create a macOS bootable USB drive, you need to select ‘BURN’ option and browse your local DMG file, then connect your USB flash to your computer.
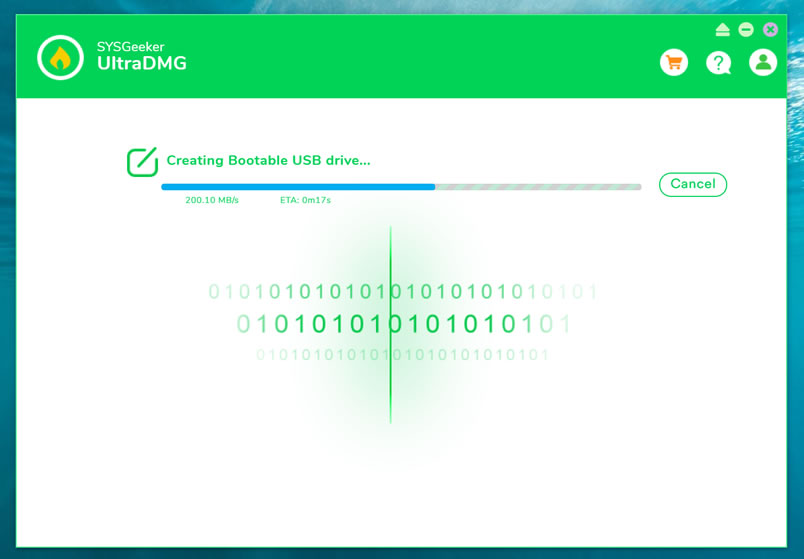
Step 3. It will take about 10 minutes to finish the burning process, please wait it to be completed, and don’t disconnect your USB drive during the burning.
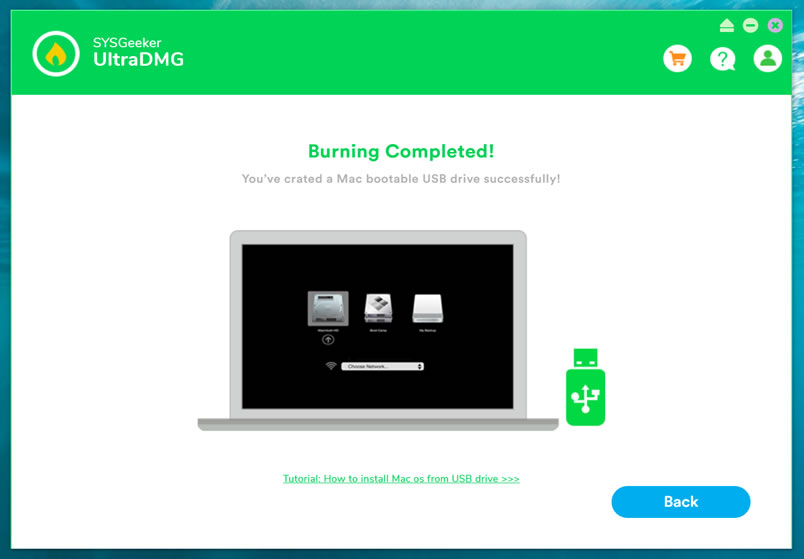
Step 4. When it shows “Burning Completed”, means you’ve successfully created a macOS installer. Now, you can connect your USB to your broken Mac computer and install the new macOS.
There are numerous situations when a bootable USB macOS installer may come in handy, SYSGeeker UltraDMG will be your best assistant to help you easily reinstall mac system without complicated command line. It allows every novice to reinstall the system by themselves.
I Hope it helps!
*** When I was trying to make a mac OS X usb bootable drive, I googled so much & found many blogs telling me how to make it form running Mac OS. But no one tells, how to make Mac OS X bootable installer pen drive from windows. I hope it will help you. For any reply or suggestions please comment.


